


How to Make Ecommerce Website in WordPress – A Step-by-Step Guide
Starting an ecommerce business may seem like a daunting process, but only if you don’t know how to launch/manage a website. Creating an online store can be a breeze if you have some prior technical experience.
However, for the vast majority of entrepreneurs without coding knowledge, the simple answer is just to hire a developer to build an ecommerce website for you, but that doesn’t always deliver the optimal results.
Luckily for you, we’ve created a simple step-by-step guide on how to make ecommerce website in WordPress to help you get started on the right foot.
Want to learn more? Let’s get into it!
Why Use WordPress for Your Ecommerce Website?
Setting up a WordPress website is surprisingly easy. Simple step-by-step instructions are provided, so even the novice store owner can get started with WordPress.
Aside from its ease of use, the main reason WordPress is an excellent platform for ecommerce websites is its wide range of powerful plugins – with EasyCommerce being a prime example.
Quick Stats About WordPress
- WordPress holds a 61.7% share of the CMS market.
- There are an estimated 34,811,931 live WordPress websites currently.
- Approximately 660 new websites are built on WordPress every day.
Why EasyCommerce?

EasyCommerce is a simple yet intuitive plugin to help you build an ecommerce store with your existing WordPress website. It has all the features you need to manage your sales, orders, customers, and more.
Its interface is fast and easy to navigate, so your workflow never gets disrupted, and you can put all your energy into engaging with customers and bringing in more sales. You can also integrate popular payment gateways (PayPal, Stripe, Square, etc.) and advanced functionalities to manage your store even more effortlessly.
So, if you’re looking for a fast, simple, and effective ecommerce platform, EasyCommerce is an excellent plugin to get you started.
How to Set Up Your WordPress Website
With a few things in place, almost anyone can build a website in WordPress. It’s no wonder that about 36.28% of the top million websites are built with WordPress.
Below is a checklist of what you’ll need to start creating your website on WordPress.
Find a Reliable Hosting Provider
WordPress is open-source and self-hosting, which means it’s all managed by you (the store owner). While it gives you more control over the goings-on of your website, there can be more room for errors and security threats.
This is why you will need a reliable hosting provider to support you while you focus on running your store. A good hosting solution offers SSL certificates, 24/7 support, and good uptime to keep your store running smoothly, even during high-traffic times.
Check out Hostinger, SiteGround, Bluehost, or Kinsta to ensure fast loading times, security, and scalability.
Register a Domain Name
Choose a domain name that reflects your business and ideally has a .com extension to build credibility. When coming up with a name, make sure it’s short, catchy, and easy to remember.
Use websites like Hostinger, NameCheap, or GoDaddy to register for a domain name for an affordable price. Depending on the platform, you can get a domain name for as little as $13/year.
Now that you have a domain name and hosting, let’s get started with your WordPress website.
How to Get Started with EasyCommerce
The sections below will detail how you can install WordPress and get your store started with the EasyCommerce ecommerce plugin.
Step 1: Install WordPress
- Log in to your Hosting Account.
- Locate the WordPress Installer (usually in the control panel or dashboard).
- Select your domain and click Install WordPress.
- Once installed, log in to your WordPress Dashboard (yourdomain.com/wp-admin).
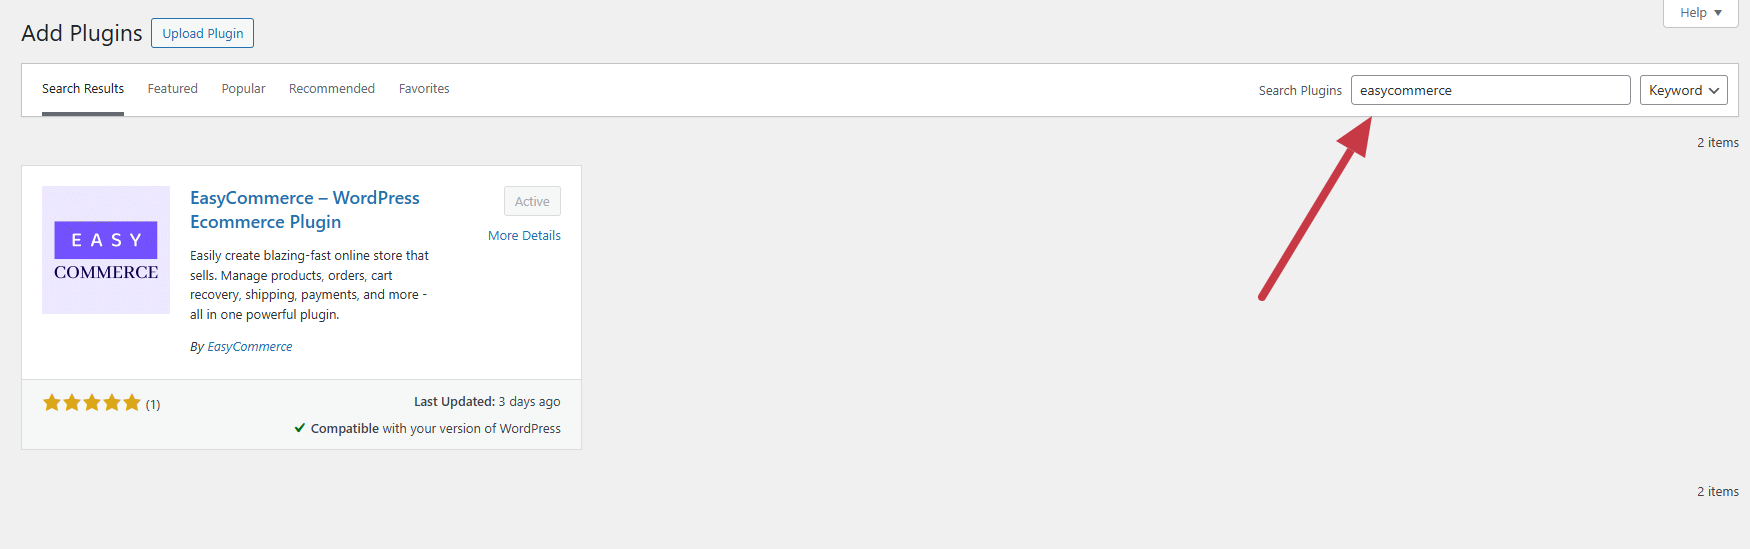
Step 2: Install and Activate EasyCommerce
- Log in to your WordPress Dashboard.
- Navigate to Plugins > Add New Plugin.
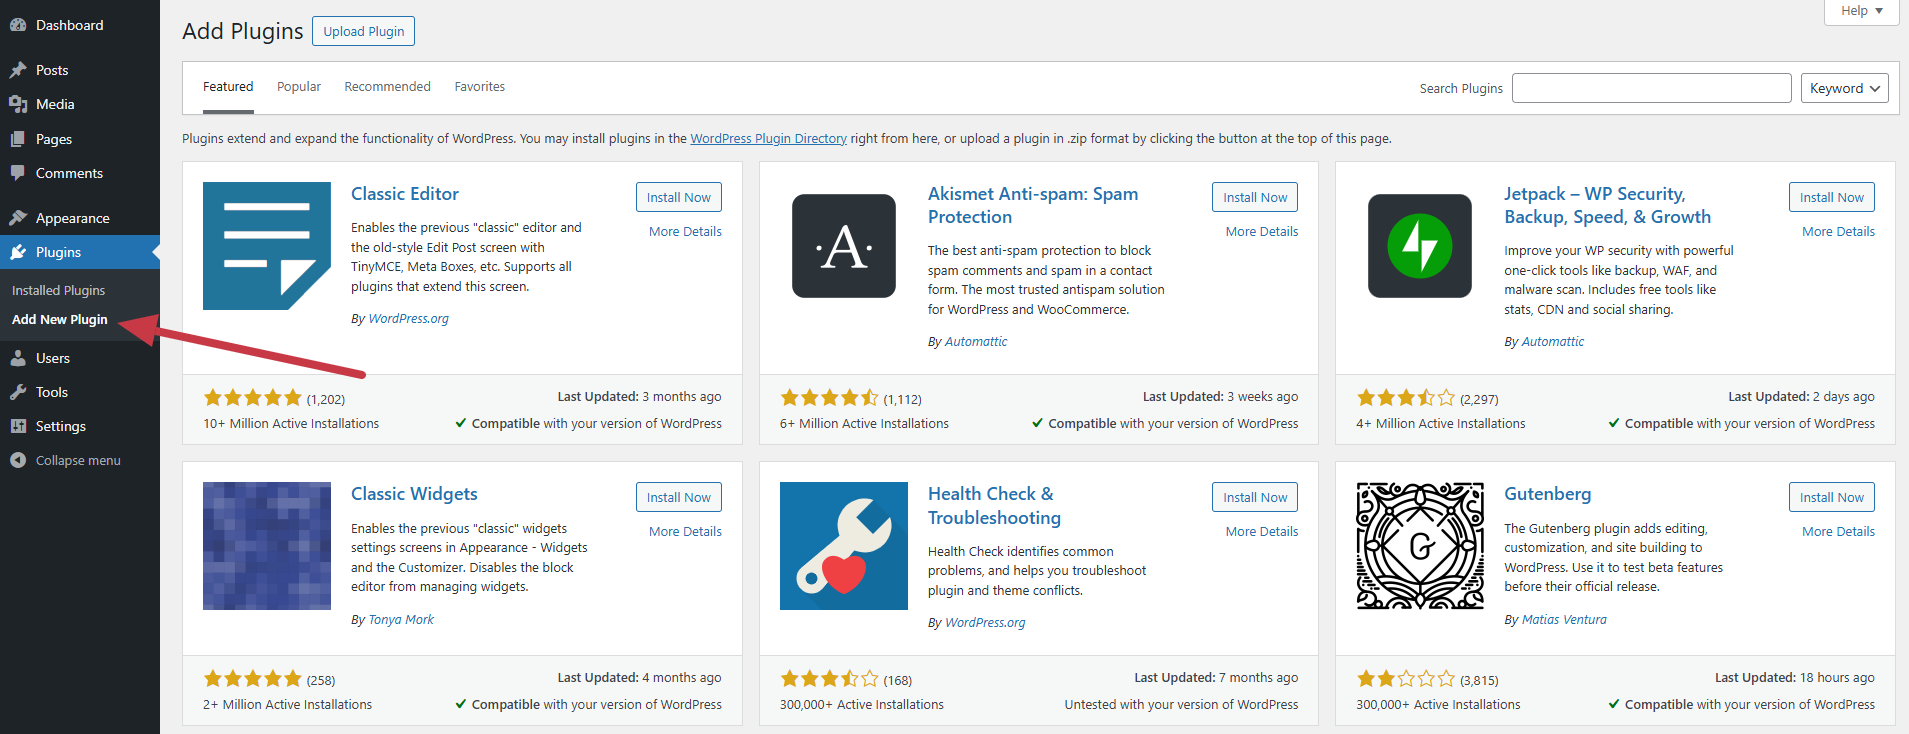
- Search for EasyCommerce in the plugin directory.
- Click Install Now and then Activate the plugin.
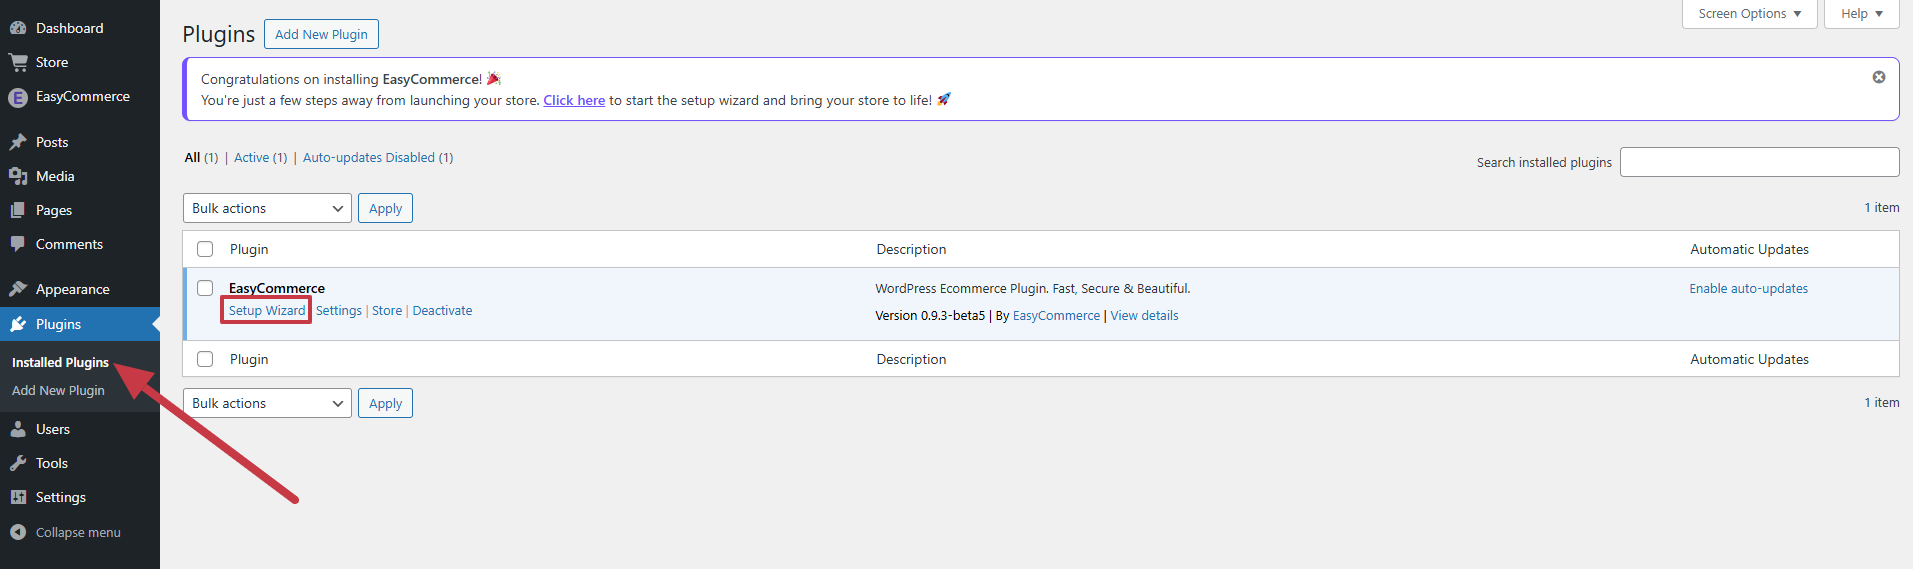
Step 3: Run EasyCommerce Setup Wizard
Navigate to Plugins > Installed Plugins and click the Setup Wizard button under EasyCommerce.
EasyCommerce Setup Wizard
In the sections below, we will guide you through each step of the setup wizard. Follow along to set up your store with EasyCommerce.
Brand Details
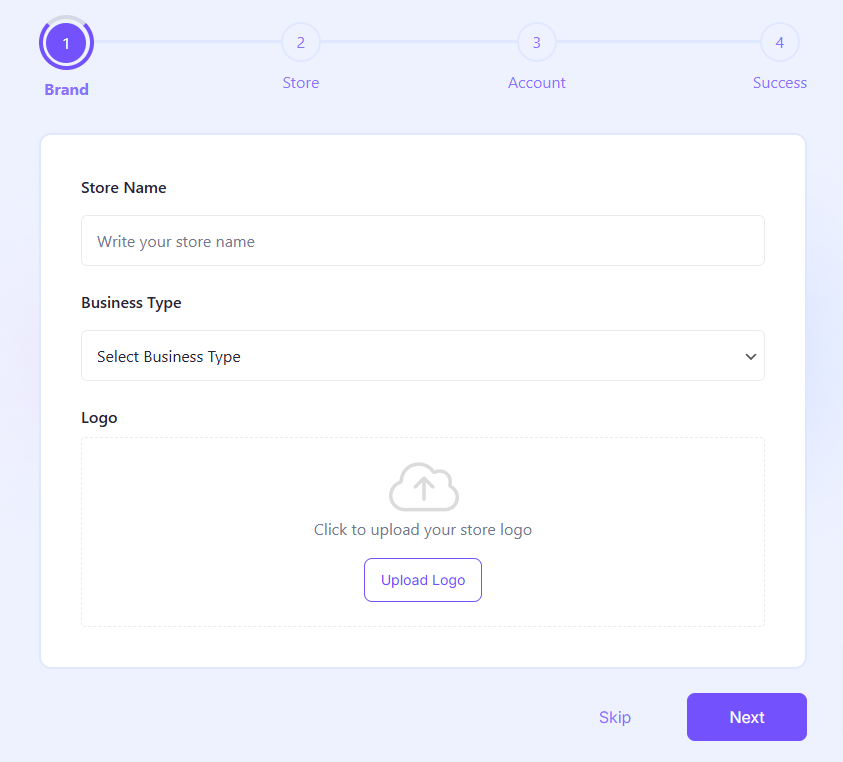
- Store Name: Enter your store’s name, which will appear across your site.
- Business Type: Choose the business type (e.g., physical products, digital goods, etc.).
- Logo: Upload your store’s logo to give it a professional look and feel.
Store Details
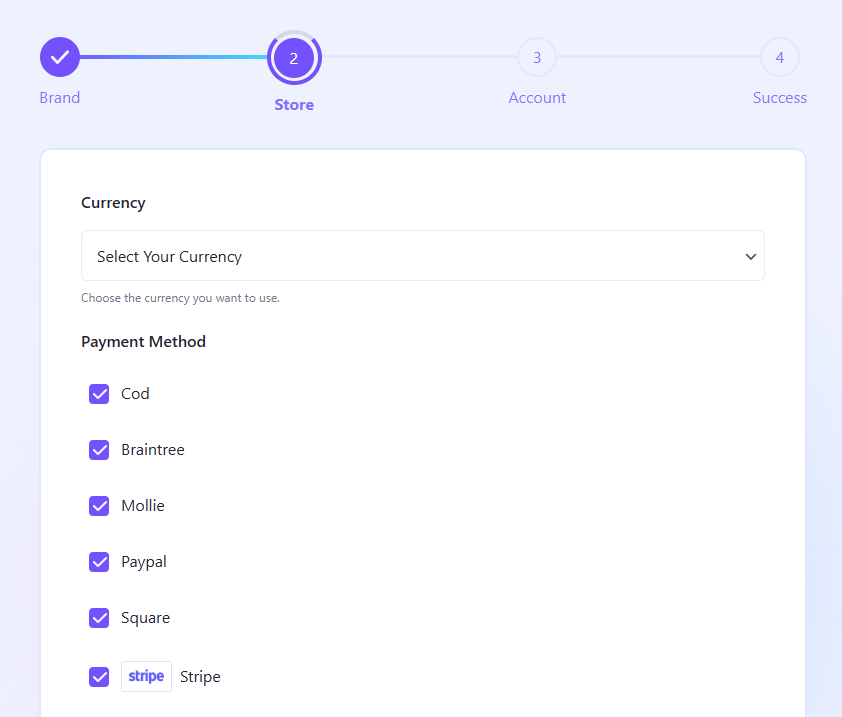
- Currency: Set your preferred currency for transactions.
- Payment Methods: Choose payment methods that suit your business (PayPal, Stripe, Square, etc.)
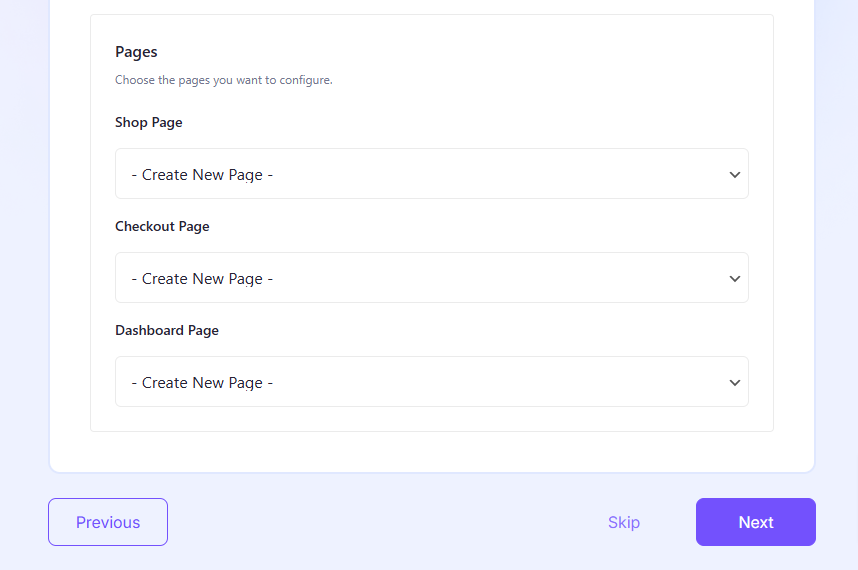
- Pages: EasyCommerce will automatically create the essential store pages (checkout, dashboard, shop) using its shortcode.
Account Details
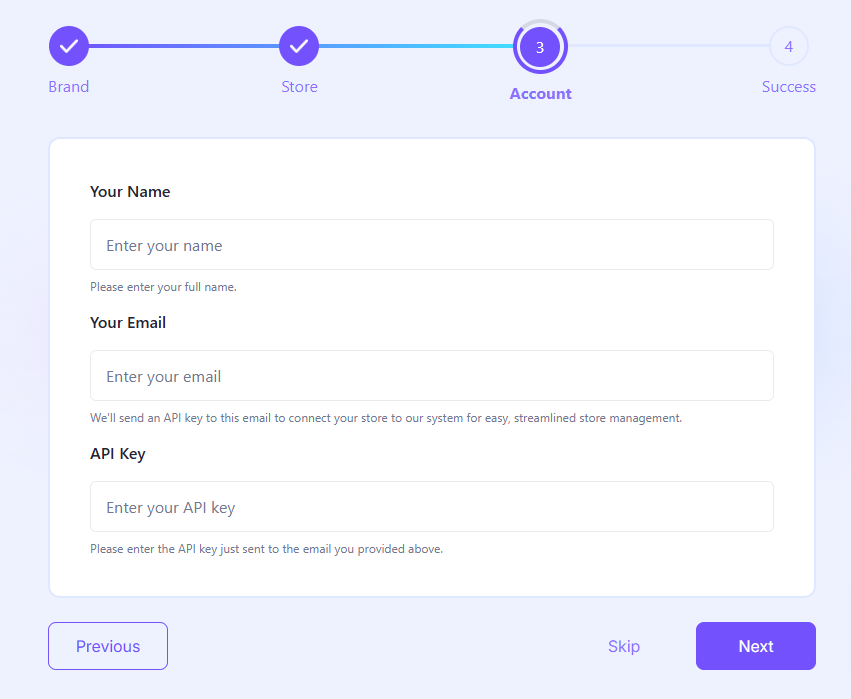
- Name: Provide your full name for store management and support.
- Email Address: Enter your email address to receive important updates and your API key to connect your store to the EasyCommerce system.
- API Key: Enter the API key from your email address.
Once you’re done, click Next, and your EasyCommerce store will be set up with the details you have provided in the Setup Wizard.
Note: We recommend using Astra for your store theme as it is highly lightweight, customizable, and the perfect option for an ecommerce store.
How to Add Products with EasyCommerce
Once your initial store is set up, let’s start adding products to your catalog with EasyCommerce.
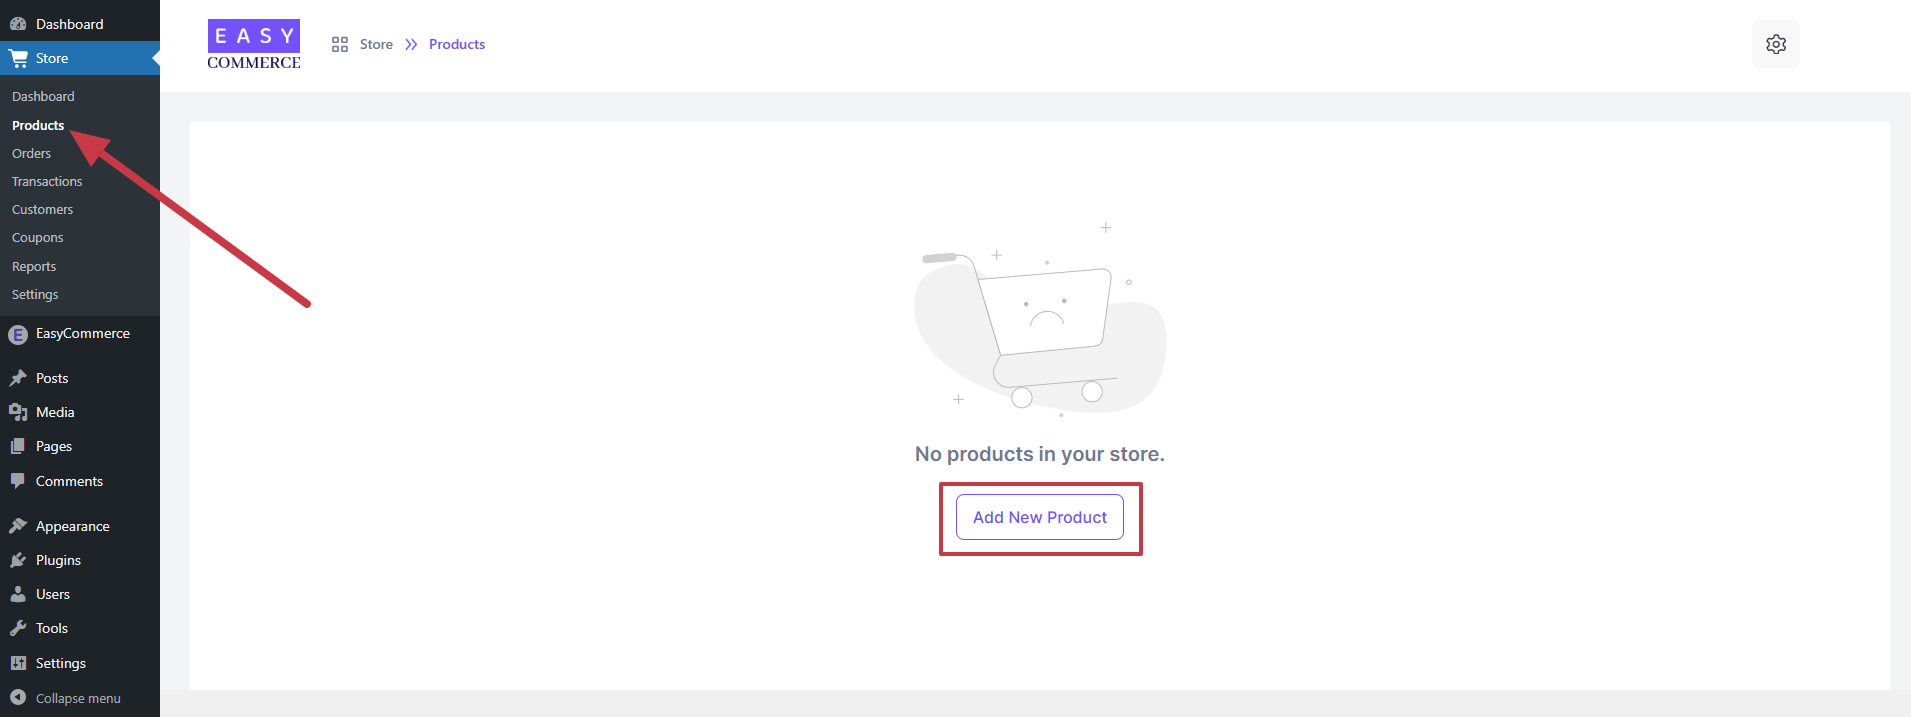
Step 1: Go to Products
- Navigate to the EasyCommerce Store > Products.
- Click “Add New Product“.
Step 2: Enter Product Details
In the new product section, fill in the following information.
Basic Information
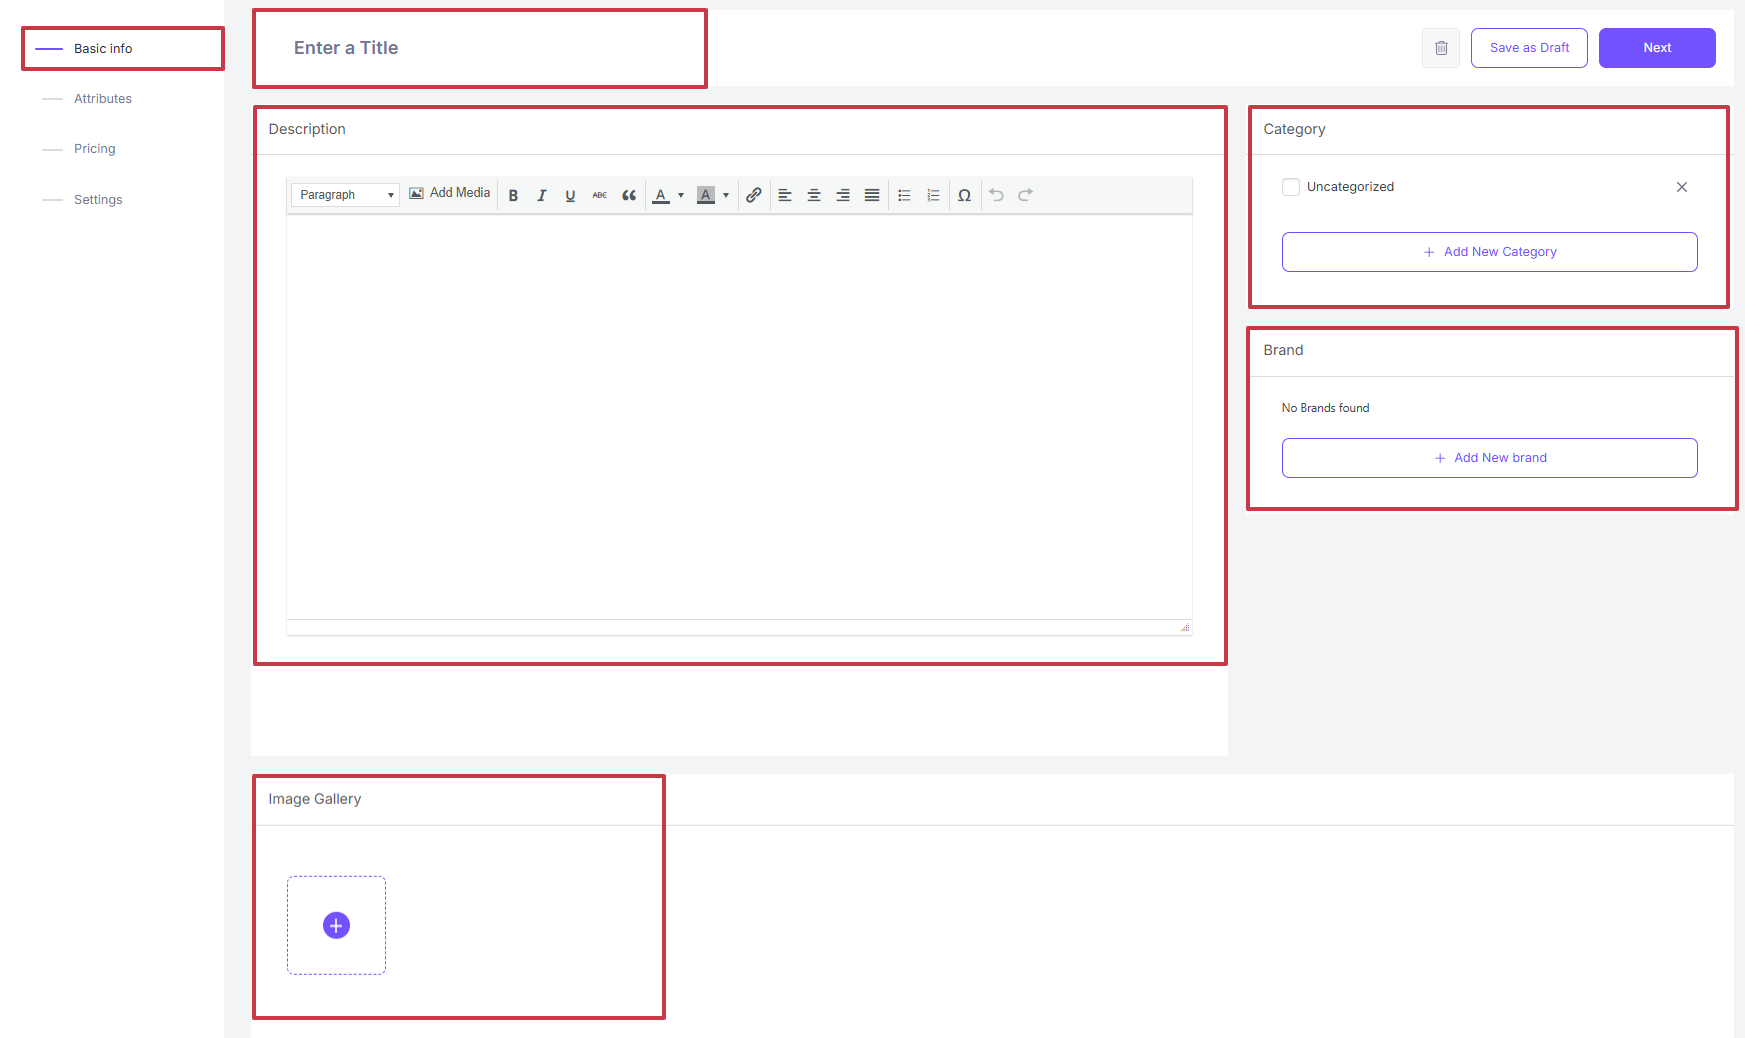
- Product Title: Add a clear, descriptive product name.
- Product Description: Highlight features, benefits, and product usage instructions.
- Image Gallery: Upload high-quality images from multiple angles and select one for the thumbnail.
- Category: Assign relevant categories.
- Brand: Specify the brand name.
Attributes
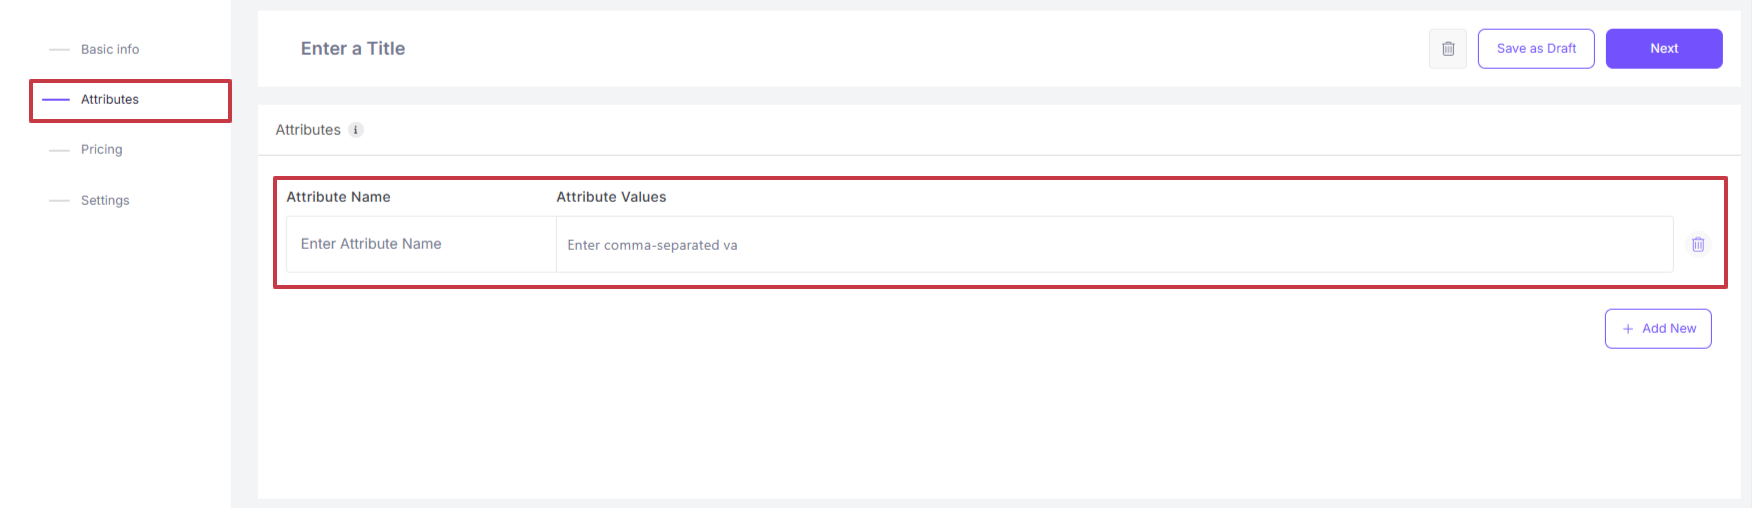
- Attribute Name & Values: Define product-specific attributes (e.g., size, colors, materials, etc.).
Pricing
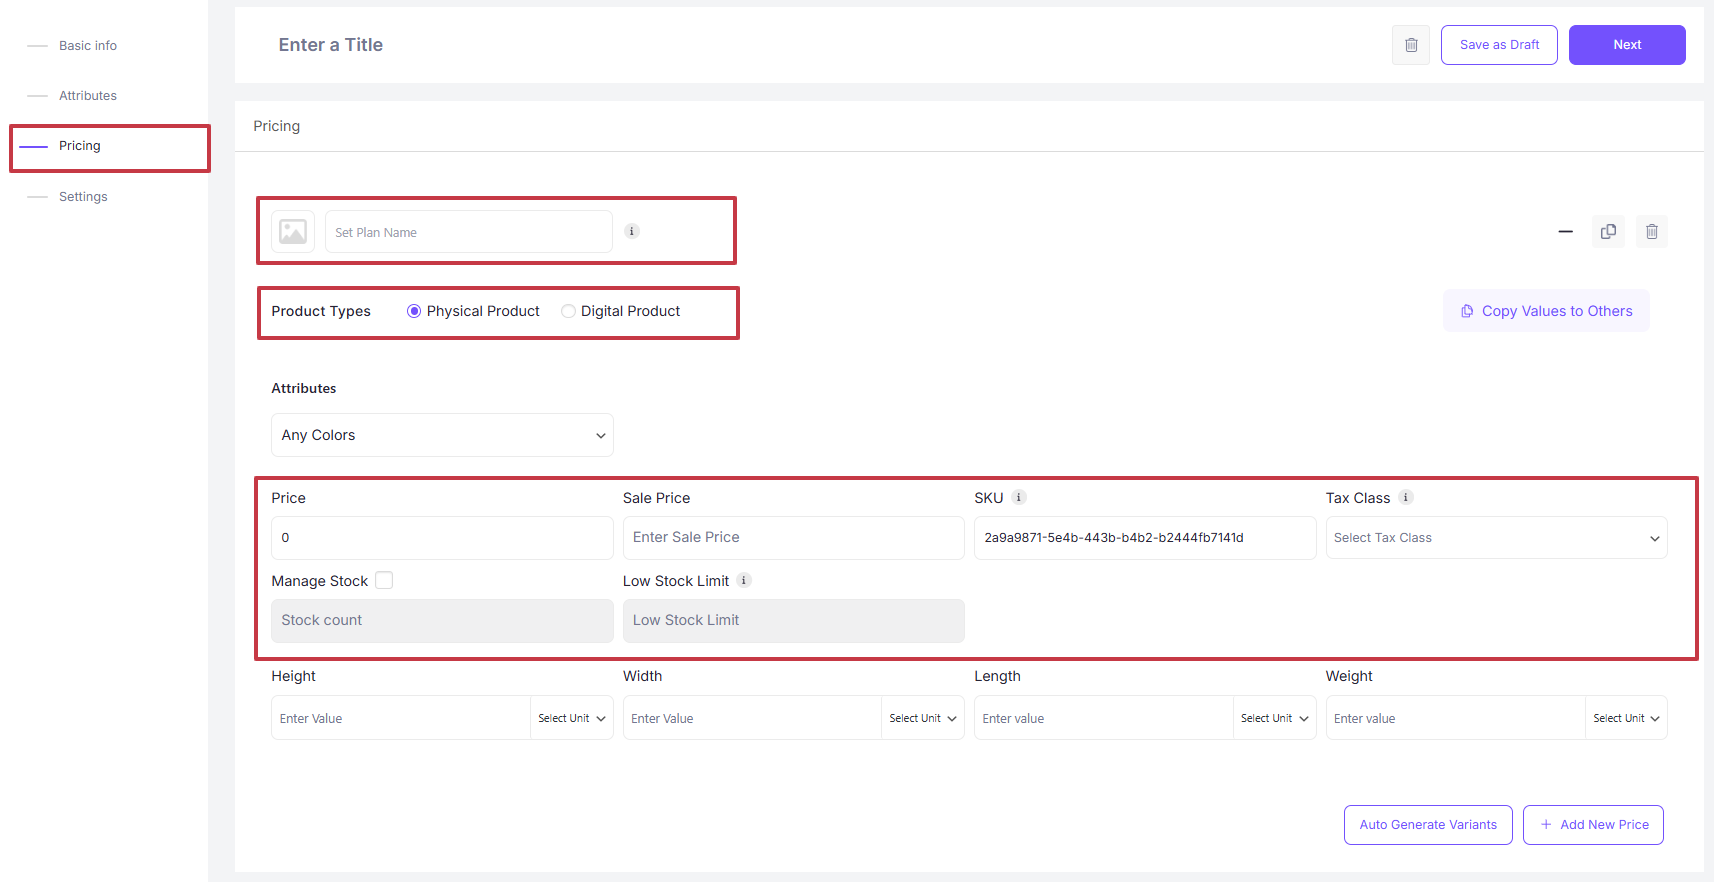
Click + Add New Price and the plus (+) button to drop down the section and add the following information.
- Set Plan Name: Define pricing tiers if applicable.
- Price: Enter the selling price.
- SKU: Assign a unique product identifier.
- Manage Stock: Enable this option to add a stock number.
- Low Stock Limit: Enter a threshold to mark a product as low stock.
- Dimensions: Add height, width, length, and weight to adjust shipping costs.
Note: Once a product stock hits the low stock number given, it will show up in the Low Stock Product Variants section of the EasyCommerce dashboard.
If you want to set separate pricing for each variant, click Autogenerate Variants to get a different section with an SKU and pricing section for each variant.
Settings
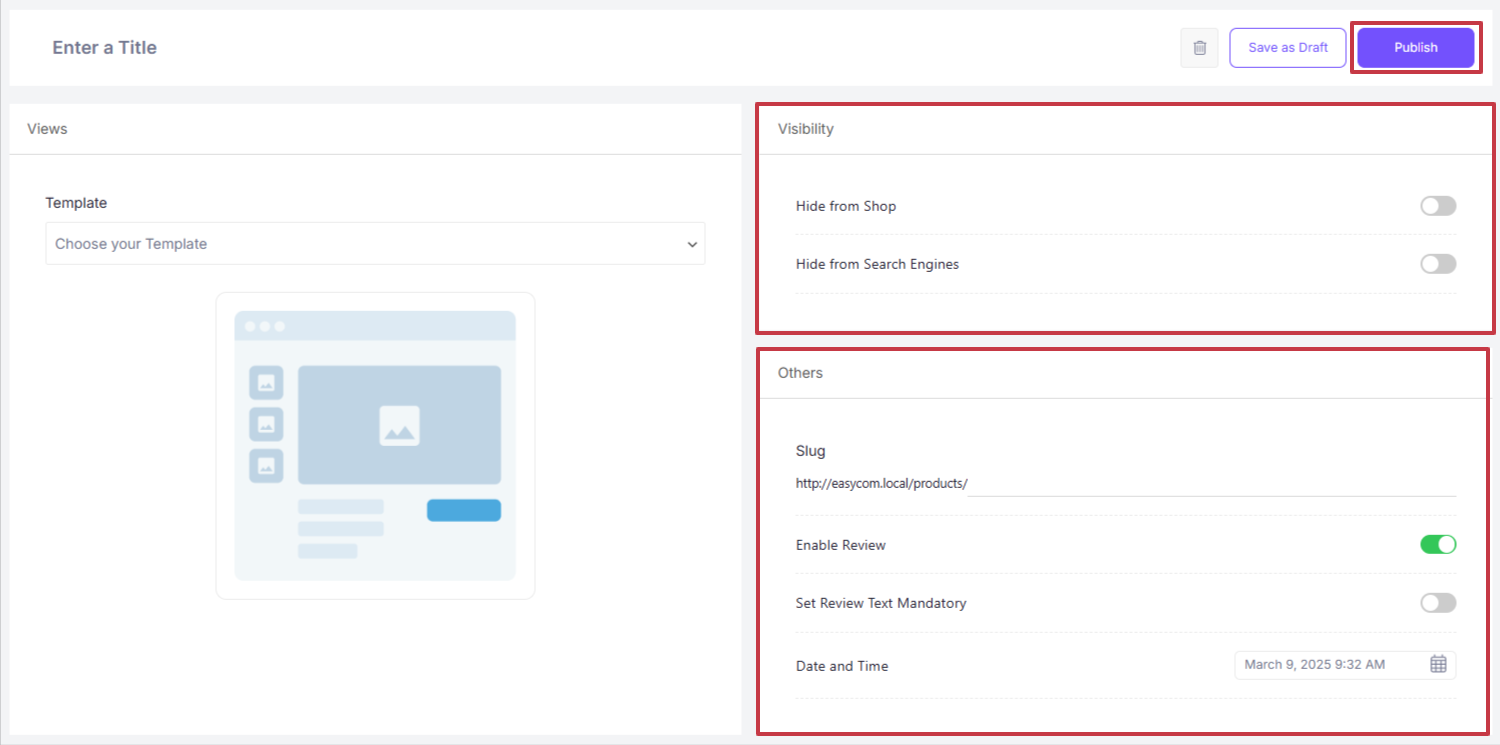
- Template: Choose a layout for your single product page.
- Visibility: Enable/disable visibility from shop and search engines.
- Slug: Customize the product URL.
- Enable Review: Select this to allow reviews on this product page.
- Date & Time: Set when the product was listed for SEO purposes.
Once you add all the details, click Publish to make this product live on your store.
How to Setup Payment with EasyCommerce
After you’ve added products to your store catalog, let’s start bringing in sales with shipping and payment gateways in place.
Follow the steps below to install the necessary payment addons from EasyCommerce.
Step 1: Activate Addons
Start by going to EasyCommerce > Addons from the WordPress dashboard sidebar. From here, you can find addons for Braintree, Mollie, Square, Stripe, and PayPal.
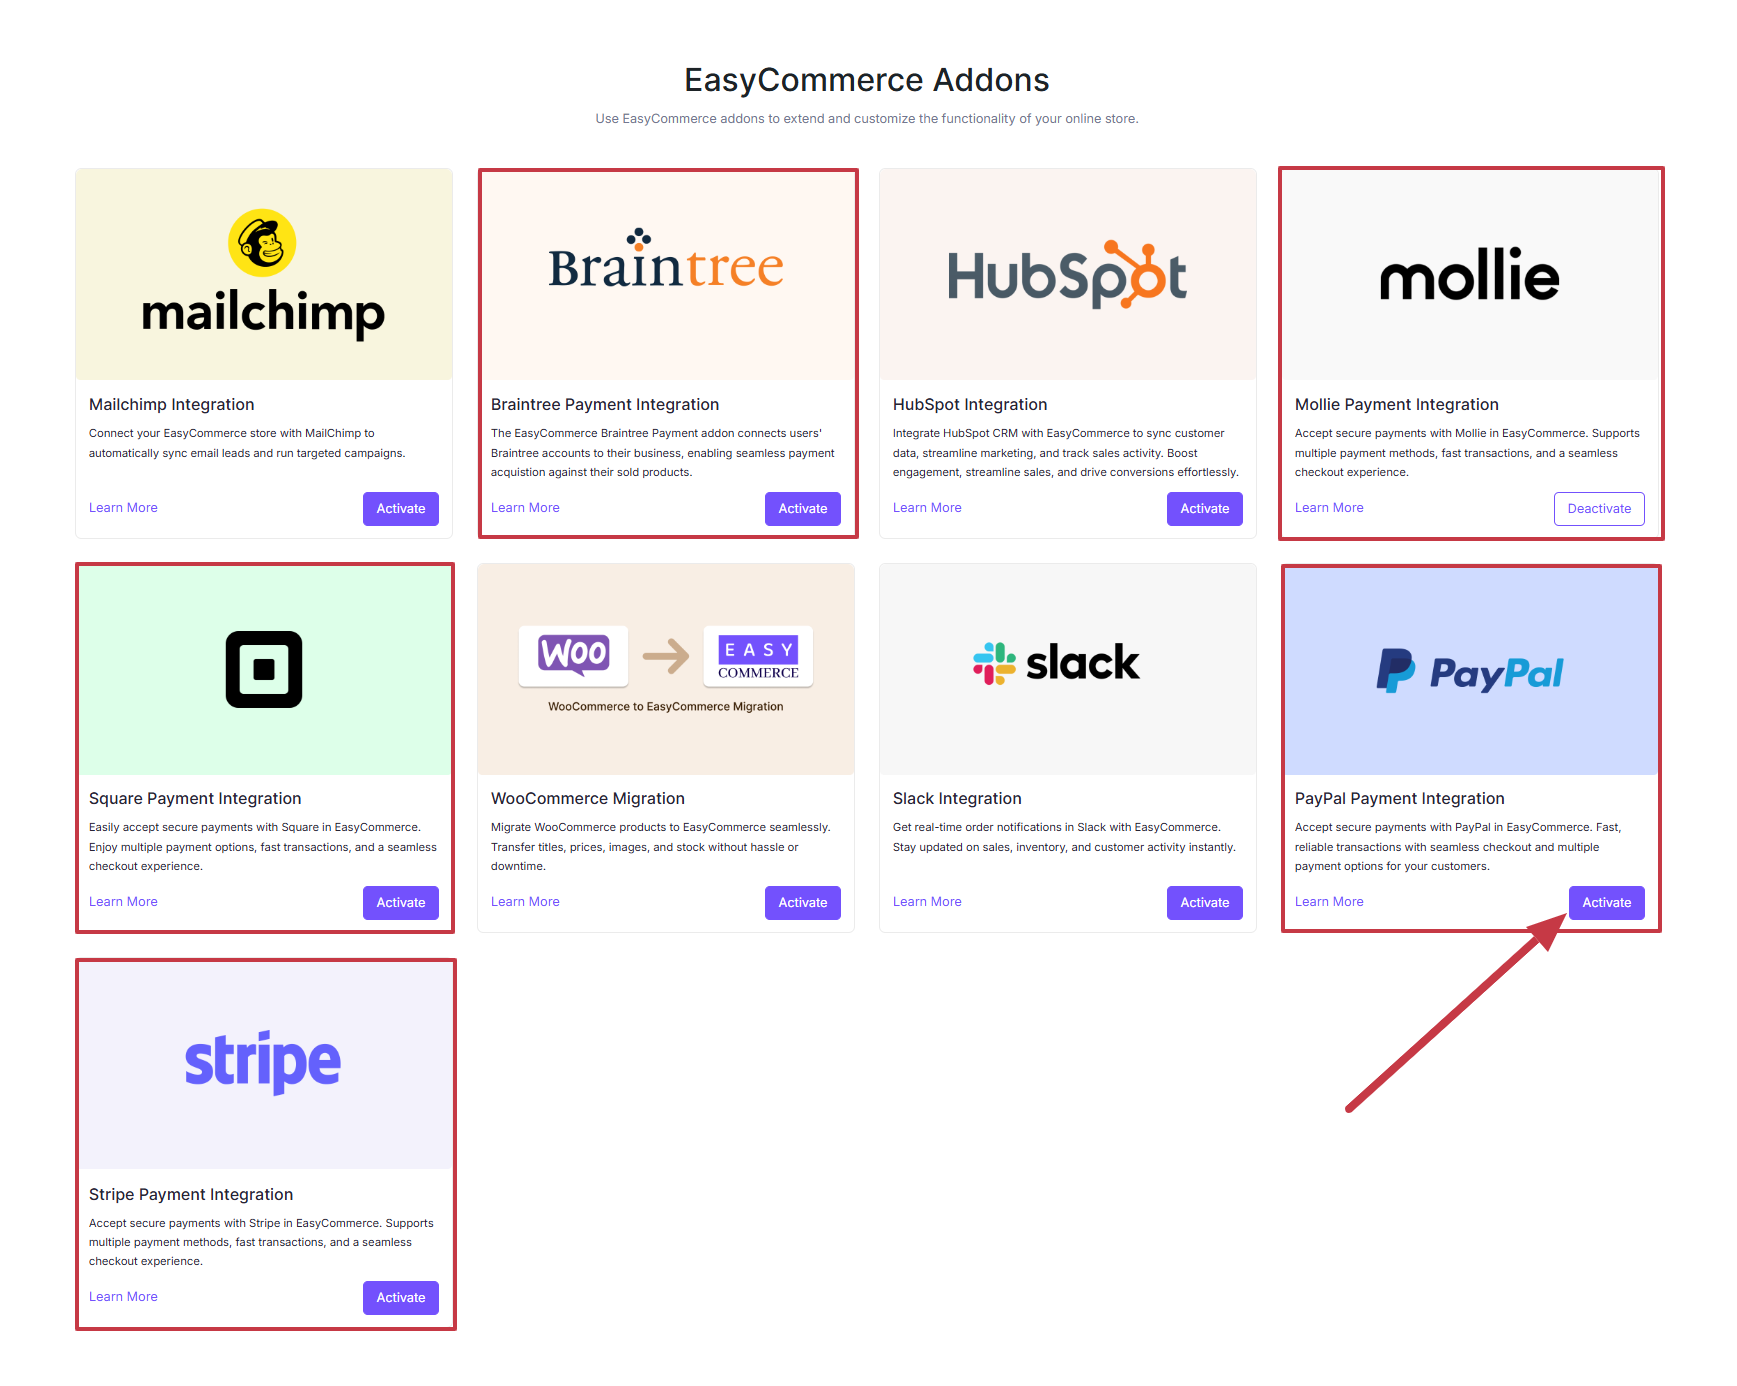
If you’ve already connected your site to the EasyCommerce system using the API key. Simply click the Activate button to integrate the addon to your store.
Step 2: Payment Method Settings
Now go to Store > Settings > Payment, and you will find all the payment gateways you’ve activated listed here.
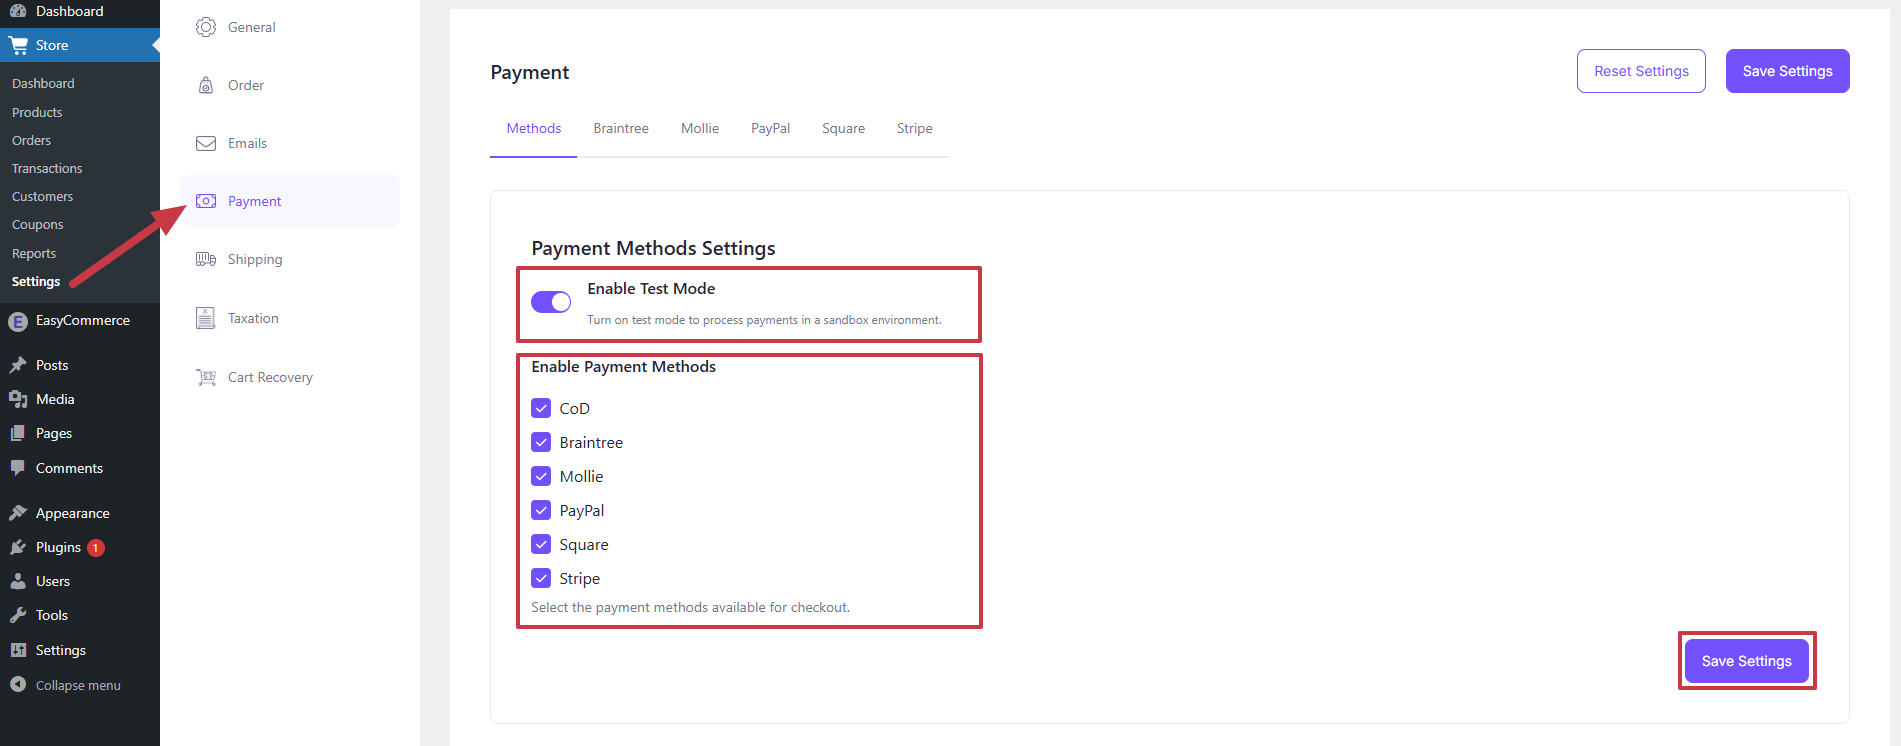
- Activate the Test Mode (optional).
- Select the payment gateway you want live on your store.
- Click Save Settings to finalize the changes.
Step 3: Add Payment Method Credentials
For this example, we will use Braintree payment integration. You can also similarly activate the other payment add-ons.
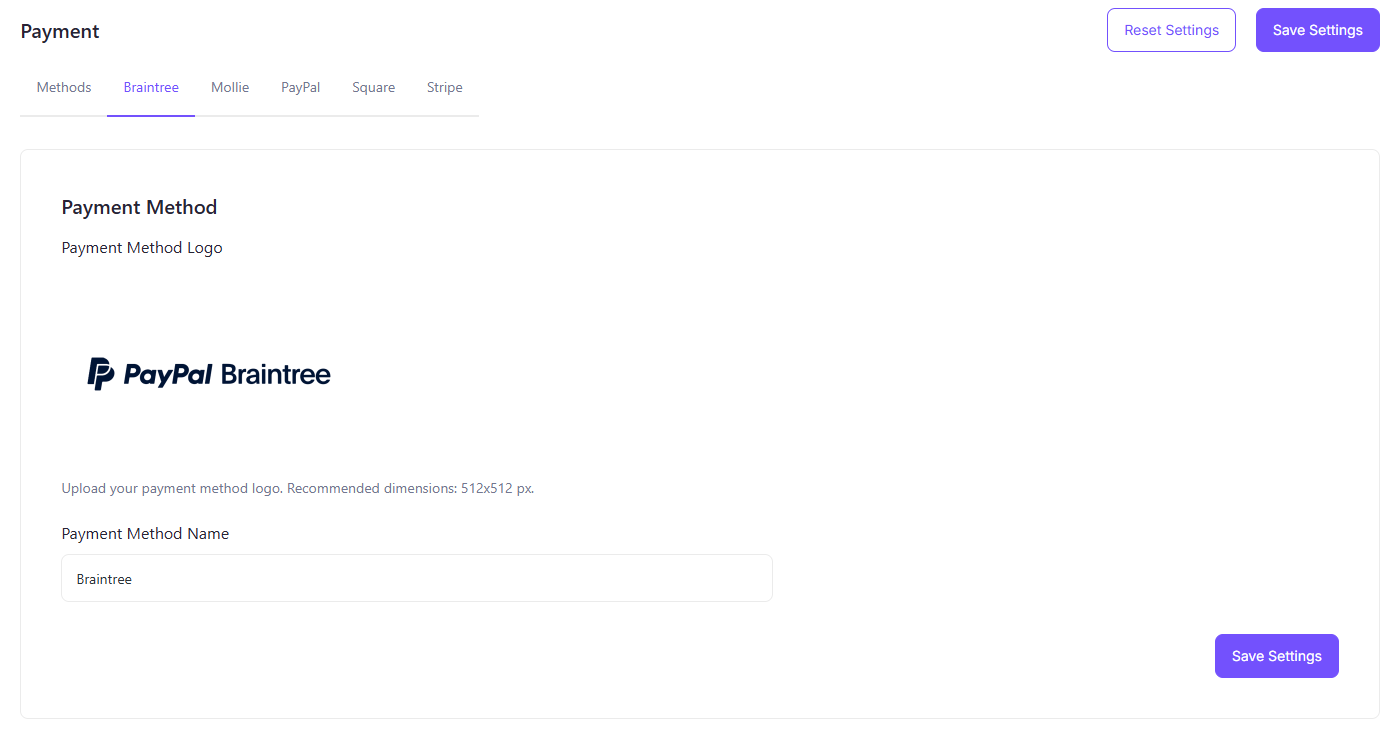
- Access the Braintree addon settings tab beside the Methods tab.
- Enter your Braintree credentials (i.e., Merchant ID, Public Key, Private Key, and Tokenization Key) to verify your connection.
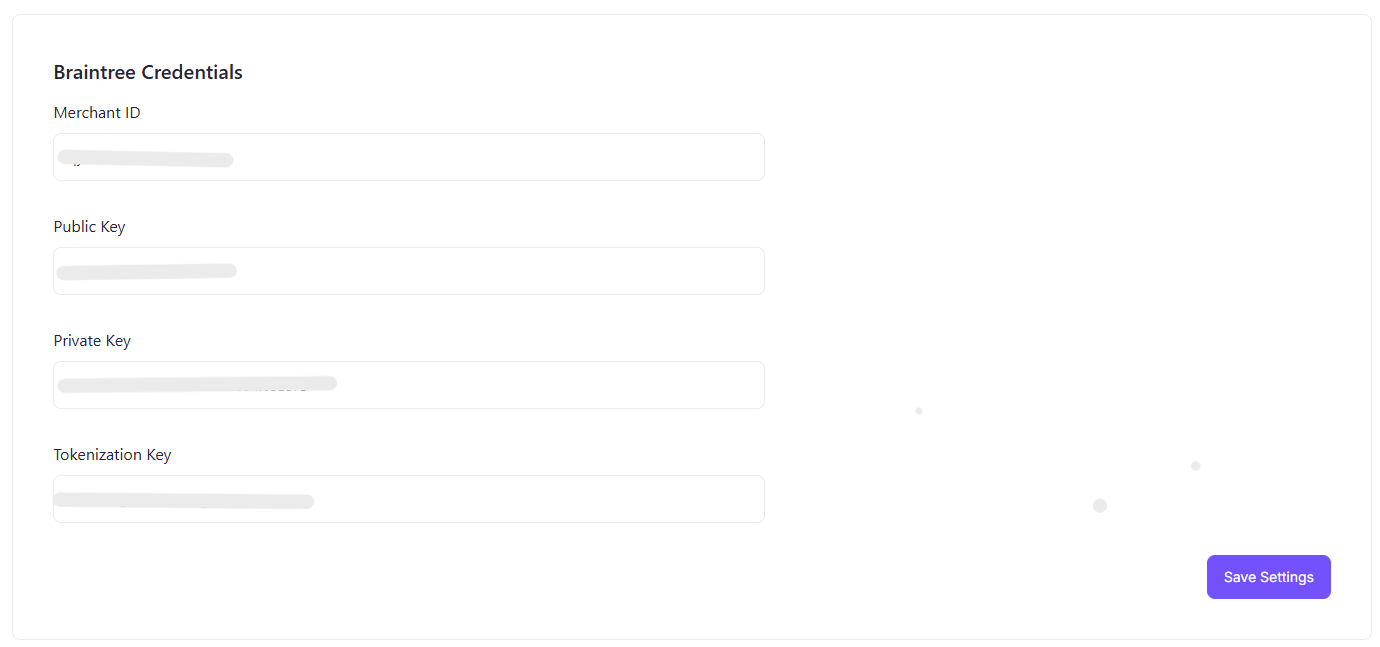
- Finally, tap Save Settings to store the changes.
Step 4: Test the Integration
Test your account for accurate transaction activities using Braintree’s Sandbox Environment. Once testing is complete, switch to live mode and start accepting payments.
Check out how to set up other payment gateways from here.
How to Setup Shipping with EasyCommerce
Provide clear shipping options based on locations to make the checkout process seamless for your customers. Follow the steps given below to set up shipping for your store.
Step 1: Shipping Settings
Navigate to EasyCommerce > Settings > Shipping > Settings, and add your preferred Shipping Countries from the dropdown.
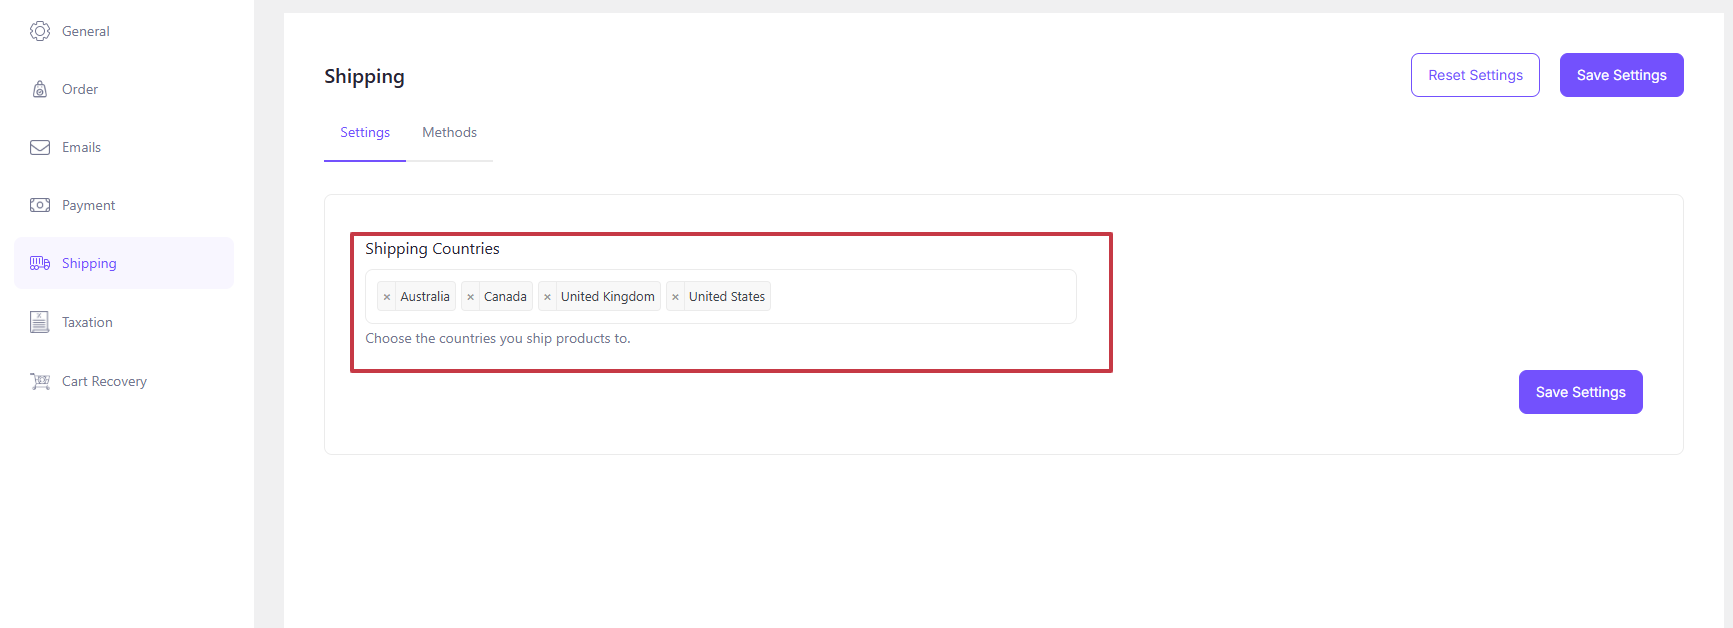
Based on the countries you’ve chosen, you can assign specific shipping methods to each zone (e.g., free shipping, flat-rate shipping, or carrier-calculated rates).
Step 2: Add Shipping Methods
From the same page, go to Methods, which you can find next to Settings. Click the Add Shipping button and enter the following information –
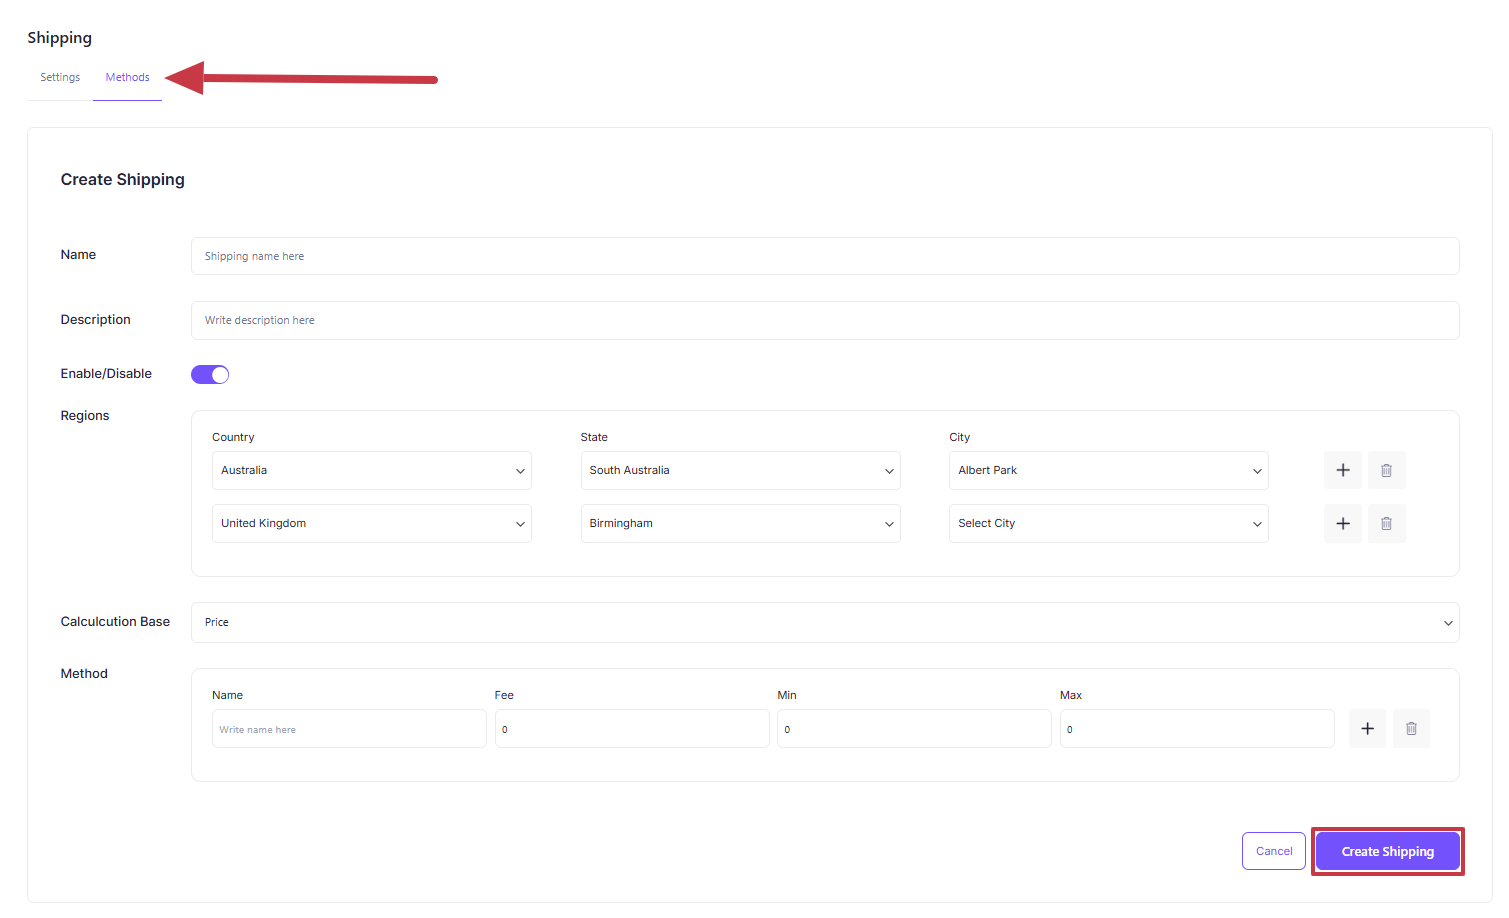
- Name: Enter a name for the shipping method (e.g., Standard Shipping or Express Delivery).
- Description: Provide a short description.
- Enable/Disable: Toggle this option to activate or deactivate the shipping method depending on availability or promotional periods.
Shipping Regions
- Country: Select the country where the shipping method will apply.
- State: Choose specific states or provinces if you need different rates or services within a country.
- City: Optionally, you can configure the shipping method to apply only to specific cities (useful for local delivery options).
Calculation Base
- Weight-based pricing (e.g., $5 for orders under 2kg, $10 for heavier items).
- Quantity-based pricing (e.g., $1 for 1 item, $5 for 5).
Method
- Method Name: Label your shipping method (e.g., Standard Shipping, Express Delivery, etc.).
- Fee: Set the shipping charges for this method (e.g., $5, $10, or free shipping).
- Minimum/Maximum Limits: Define any restrictions based on order value, weight, or other criteria (e.g., free shipping for orders over $50).
Once you’re done, hit Create Shipping to enable it on your store and offer it during checkout.
How to Setup Taxation with EasyCommerce
EasyCommerce automates tax calculations and provides clear and accurate tax calculations at checkout – all you have to do is configure the classes and rates and apply them to your products.
Let’s look at how to setup tax on your store with EasyCommerce.
Step 1: Add Tax Countries
From your WordPress dashboard, go to Store > Settings > Taxation. From here, add the countries where you want to sell your products.
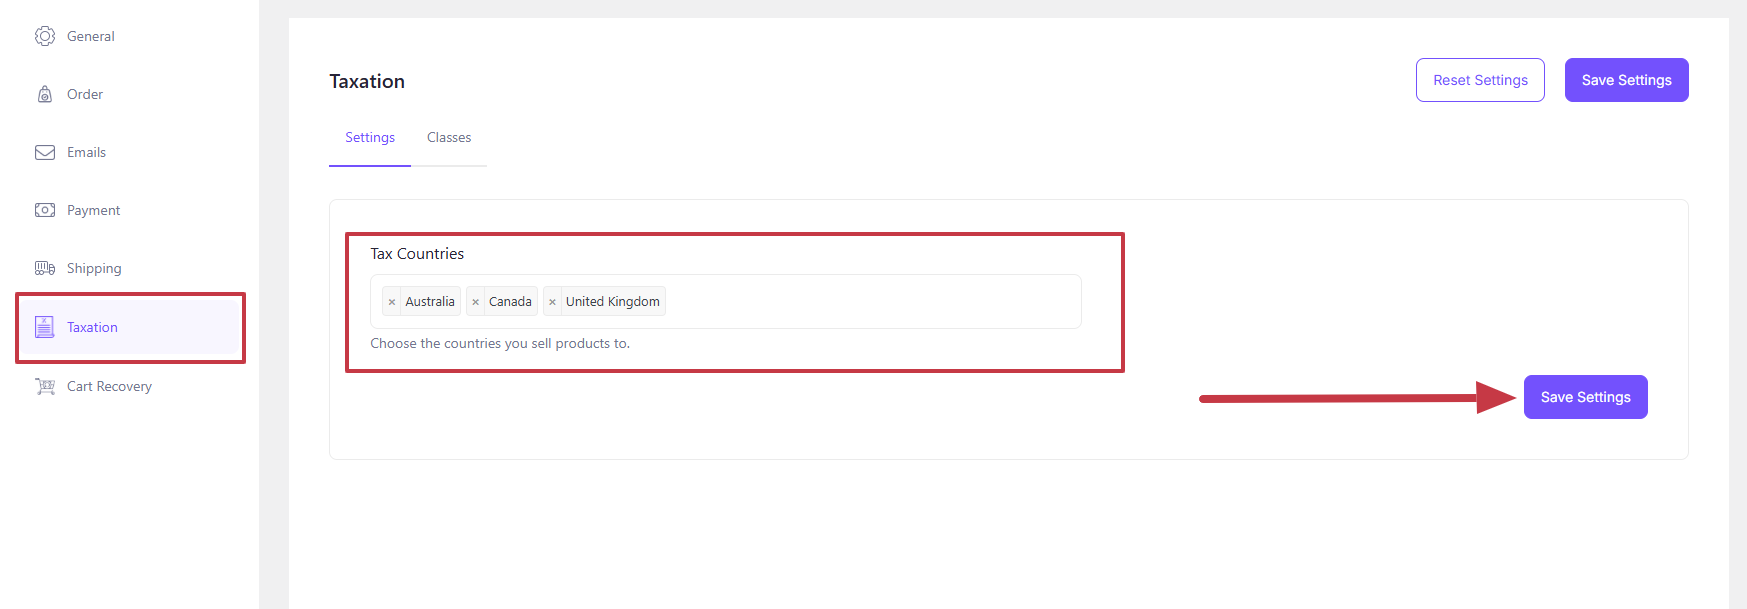
And click Save Settings to apply the changes.
Step 3: Configure Tax Classes
From the Classes section, which you can find next to Settings, click + Add Class and enter the following details –
- Name: Define a tax class name (e.g., “Standard Tax,” “Reduced Rate”).
- Description: Provide a brief explanation of the tax class.
- Enable/Disable: Toggles to activate or deactivate the tax class.
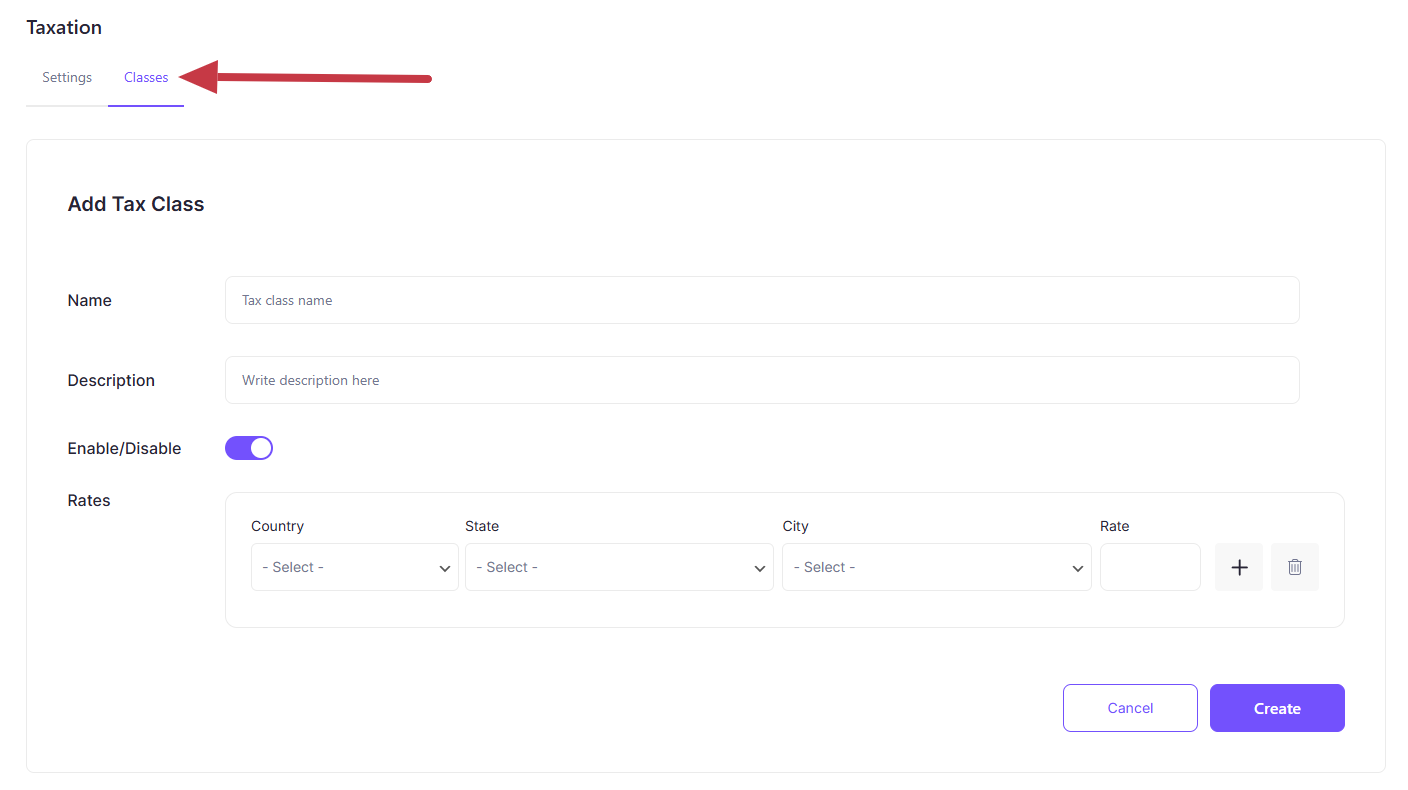
Tax Rates
- Select the Country, State, and City where the tax rate applies.
- Enter the Rate (e.g., 10%, 5%).
- Click Create to confirm the tax settings.
Before making your tax classes live in your store, we recommend testing it out. Place a test order to confirm that tax is applied accurately based on the buyer’s location and the assigned tax class.
If any discrepancies are found, revisit the tax settings and make adjustments as necessary.
How to Test Your EasyCommerce Store
If everything is set and ready to go, make sure to test the following areas to ensure each section is working as intended.
Product Pages: Ensure product details, images, and prices are clear and accurate.
Checkout Process: Go through the checkout flow as a customer to make sure payments, taxes, and shipping options work smoothly.
Payment Gateway: Test all payment methods you’ve integrated (e.g., PayPal, Stripe) to ensure all transactions are processed correctly.
Wrapping Up
Building an ecommerce website with WordPress is pretty straightforward by itself, but if you use EasyCommerce, the process becomes even simpler and budget-friendly. With its scalability, flexibility, and user-friendly interface, you can easily build a store that grows alongside your business.
Follow this guide to learn how to make an ecommerce website in WordPress with EasyCommerce and provide an exceptional shopping experience every time!
Frequently Asked Questions (FAQs)
Is EasyCommerce free to use?
Yes, EasyCommerce is completely free to install and use. However, domain and hosting may incur costs.
What types of products can I sell with EasyCommerce?
EasyCommerce lets you sell physical products and digital downloads. You can add digital downloads from the same page as physical products.
Does EasyCommerce support multiple payment methods?
Absolutely! EasyCommerce integrates with popular payment gateways such as PayPal, Stripe, Mollie, and Square. It also supports alternative payment methods like cash on delivery (COD).
How much does it cost to set up an EasyCommerce store?
The cost varies depending on your needs. The basic version is free, but you may need to budget for the following –
- Domain name ($10–$20/year)
- Hosting ($5–$30/month)
- Premium themes or extensions (optional, starting at $20+)
How do I get support for EasyCommerce?
EasyCommerce offers support through online documentation, community group, and direct support through the ticket portal.

